Affiliate disclosure: Cross Stitch Expo may earn a commission from qualifying purchases made through links on this page, at no additional cost to you. How we choose what we feature.
A single counting mistake can move an entire section of a cross-stitch project one square out of position.
Sometimes you notice immediately.
Sometimes you discover it 2,000 stitches later.
Gridding your fabric gives you reference lines that correspond to the grid on your chart, making it much easier to see where you are and catch counting errors before they spread.
But there is one important rule:
Anything you put on your fabric should either be safely removable—or intended to remain hidden.
That makes the method you choose important.
 The Quick Answer
For most cross-stitch projects, the safest practical gridding choices are:
- 1. Pre-gridded cross-stitch fabric
- 2. Removable monofilament gridding line
- 3. A water-soluble fabric marker that you have tested first
Avoid regular pens, permanent markers and ordinary pencils.
And be cautious with heat-erasable pens: removing a mark with heat does not necessarily mean the marking material has physically disappeared from the fabric.
 What Is Cross-Stitch Gridding?
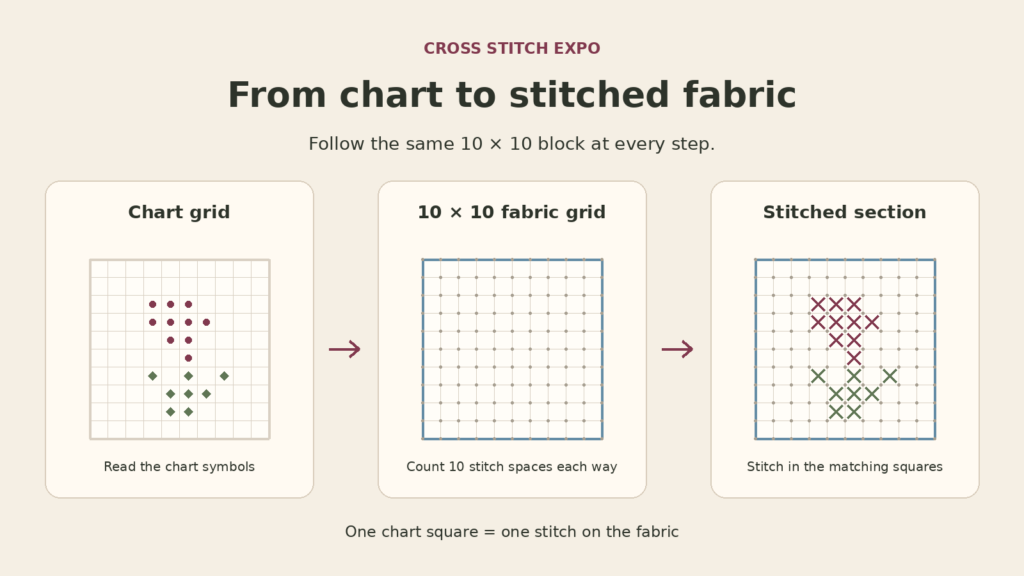
Most cross-stitch charts are divided into blocks of 10 × 10 stitches.
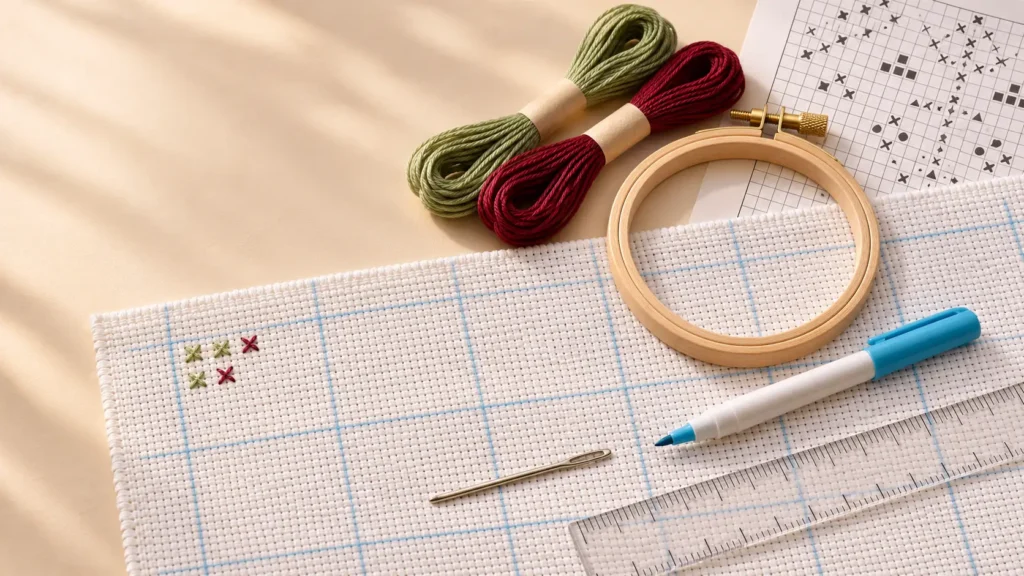
Gridding places corresponding 10 × 10 reference lines on your fabric.
Instead of counting:
37 stitches across,
you can think:
three full grid blocks plus seven stitches.
That is much easier to check.
Gridding is especially helpful for:
- large designs,
- full-coverage projects,
- patterns with isolated stitches,
- projects with frequent color changes,
- stitchers who move around the chart,
- and anyone who simply wants extra reassurance while counting.
You do not have to grid.
It is a tool, not a rule.
Method 1: Pre-Gridded Fabric
This is the lowest-effort option.
Pre-gridded Aida or evenweave already contains reference lines dividing the fabric into counting blocks.
You simply position your design correctly and begin stitching.
Zweigart’s Easy Count Aida, for example, incorporates a washable 10-stitch grid into the fabric so that the grid corresponds to the blocks on a counted-cross-stitch chart. Zweigart says the guide disappears after washing according to the fabric’s specified instructions.
Advantages
- No measuring
- No drawing
- No separate gridding thread
- Grid is consistent across the fabric
- Particularly useful for large or full-coverage designs
Things to consider
You will eventually need to remove the grid according to the manufacturer’s directions.
That means you should also consider whether the other materials in your project can safely tolerate the required washing process.
If you are using hand-dyed fabric, hand-dyed threads or specialty materials, don’t assume every washing instruction is interchangeable.
DMC likewise recommends checking the washing instructions for every material and embellishment before washing finished needlework.
Cross Stitch Expo Recommendation
Pre-gridded fabric is particularly attractive for:
- full-coverage projects
- and
very large charts
where manually drawing hundreds of grid lines would become a project of its own.
Method 2: Removable Gridding Line
Instead of drawing on the fabric, you can stitch a temporary grid into it.
Specialized products such as Easy-Count Guideline™ use a smooth monofilament-style line specifically for this purpose.
The manufacturer describes the line as creating grid boxes directly on the fabric so the stitcher can match locations against the chart, and it is intended to be removed after stitching.
Why this method appeals to cautious stitchers
Nothing has to dissolve.
Nothing has to disappear chemically.
Nothing is drawn onto the textile.
When the stitching is complete, the temporary line is removed.
That makes this an attractive choice when you don’t want to introduce marking ink to the project.
Why specialized gridding line helps
Ordinary sewing thread can potentially be pierced by your stitching needle.
If you accidentally stitch through it repeatedly, removing the grid later can become difficult.
A smooth monofilament gridding line is designed so that the needle does not easily split the material, helping it pull back out after the project is complete.
How to create the grid
Find the center of the fabric.
Identify the center of the chart.
Run a horizontal reference line through the fabric center.
Then add another line every 10 stitch positions.
Repeat vertically.
Your fabric should now visually correspond to the heavier 10 × 10 lines on the chart.
Don’t pull the grid too tightly
The gridding line is a reference.
It isn’t supposed to tension the fabric.
Leave it relaxed enough that it does not distort the weave.
When should you remove it?
You can remove portions as you complete areas, or remove the entire grid after the stitching is finished.
Follow the gridding-product instructions.
Cross Stitch Expo Recommendation
If you are working with expensive fabric or a project you do not intend to wash, removable gridding line is one of the most reassuring methods.
 Method 3: Water-Soluble Fabric Marker
This is probably the fastest way to manually grid ordinary washable fabric.
Use a pen specifically designed to make water-removable marks on fabric.
DMC itself uses water-soluble pens in embroidery instructions where temporary guidelines are needed, so this is an established textile-marking technique.
But there is one step that should never be skipped.
TEST THE PEN FIRST
Before drawing a grid over an entire project:
- take a scrap of the exact same fabric,
- make several marks,
- leave them in place,
- then remove them following the manufacturer’s instructions.
Make sure the marks disappear completely.
Independent cross-stitch instructions similarly recommend testing a water-soluble pen on scrap fabric before applying a full grid.
If you do not have scrap fabric, test carefully near an edge that will later be hidden by finishing—but scrap is preferable.
How to Grid With a Water-Soluble Pen
1Step 1: Find the Center
Fold the fabric gently in half horizontally.
Then vertically.
The intersection identifies the approximate center.
You can also measure if you prefer not to crease the fabric.
2Step 2: Match the Chart Center
Find the horizontal and vertical center lines on the chart.
Those should correspond with the center lines you establish on the fabric.
3Step 3: Count 10 Stitch Positions
Start from the center.
Count carefully.
Then count again.
Mark the next grid line.
Continue every ten stitches.
4Step 4: Draw Lightly
You do not need a dark, heavy line.
You need enough contrast to see where the grid falls.
A ruler can help keep longer lines straight.
5Step 5: Repeat in the Other Direction
Rotate the fabric.
Create the horizontal grid.
When finished, the fabric should resemble the 10 × 10 block structure on the chart.
 Should the Line Run Through the Hole or the Stitch Block?
Pick one system and stay consistent.
This matters more than which convention you choose.
Before beginning the actual stitching, compare one complete 10 × 10 fabric block with one chart block.
Count:
1, 2, 3 … 10
and make certain your reference lines truly represent ten stitch positions.
A beautiful grid that is one square wrong is worse than having no grid at all.
Remove the Pen According to Its Instructions
Don’t improvise.
Some water-soluble markers require rinsing.
Others may specify a different process.
For example, the currently sold Mr. Pen washable fabric markers are marketed as water-soluble, and current product information warns against ironing the marks before removal.
What About Dritz Mark-B-Gone?
Dritz also produces fabric-marking products intended for temporary sewing and craft marks.
Its Dual Purpose Marking Pen combines a water-removable blue Mark-B-Gone component with a separate disappearing-ink marker. Current product data identifies the product under Amazon ASIN B00A2H1A3W.
For a long-term cross-stitch grid, I would favor the water-removable marking side rather than relying on an air-disappearing line that may fade while the project is still underway.
 Why We Don’t Recommend Ordinary Pencil
Pencil feels safe because it seems less permanent than ink.
That does not mean it is easy to remove from textile fibers.
Graphite can remain embedded in the fabric and may become particularly frustrating when the project leaves large areas unstitched.
If a mark is expected to disappear from the finished piece, use a tool designed for temporary textile marking instead.
Why We Don’t Recommend Regular Pens
Ballpoint ink and permanent markers are not cross-stitch gridding tools.
Even if the completed design will cover much of the fabric, a tiny miscalculation can leave permanent lines visible in an unstitched area.
The risk isn’t worth the convenience.
What About Heat-Erasable Pens?
This is where Cross Stitch Expo would be cautious.
A heat-erasable craft pen may appear to disappear when ironed.
But “invisible” is not necessarily the same thing as “removed.”
Some cross-stitch guides warn that heat-erased marks can leave ghost lines or reappear under cold conditions.
For temporary chart grids on a project you may spend hundreds of hours stitching:
water-removable or physically removable methods are easier for us to recommend.
We would not make a heat-erasable pen our first choice.
What About Air-Erasable Pens?
Air-erasable ink can be useful for temporary sewing marks.
It may be less useful for a cross-stitch grid that needs to remain visible for:
- weeks,
- months,
- or potentially years.
A grid that disappears halfway through a large project has stopped doing its job.
For long-term projects, choose something you control when removing.
Gridding Hand-Dyed Fabric
This deserves extra caution.
If removing your grid requires soaking the project, make sure the fabric and threads can tolerate that treatment.
Hand-dyed materials may have special care requirements.
Test first.
If you are uncertain about washability, a physically removable gridding line may make more sense than a washable marker.
Gridding Linen and Evenweave
The same 10 × 10 principle works.
But remember:
if you stitch over two fabric threads, one cross-stitch position spans two threads.
Do not accidentally create your grid every ten fabric threads when you intend every ten cross stitches.
For example:
- on 28-count linen stitched over two,
- 10 cross stitches span 20 fabric threads.
Take your time with the first section.
Once it is correct, use it as your reference.
Partial Gridding
You do not have to cover the entire piece of fabric.
Some stitchers grid only:
- the center lines,
- the current working area,
- or several blocks ahead of where they are stitching.
This can save preparation time.
It is particularly useful if you prefer stitching sooner rather than spending an evening preparing the entire project.
Do Small Projects Need Gridding?
Probably not.
If your design is:
- 40 × 40 stitches,
- uses five colors,
- and begins in the center,
- the time spent drawing a grid may exceed the time it saves.
Gridding becomes more valuable as the cost of a counting mistake increases.
When Gridding Helps Most
Consider it strongly when you’re stitching:
Full Coverage
Thousands of closely packed stitches make reference points valuable.
Large Samplers
A mistake in one motif can affect everything that follows.
Confetti-Heavy Designs
Isolated stitches become easier to place within clearly identified blocks.
Patterns With Large Empty Spaces
You may need to jump from one part of the design to another without nearby stitches to use as reference points.
Projects You Work Sporadically
A grid helps you find your position again after the project has been sitting in a bag for several months.
 A Fourth Option: Easy Count Fabric
If you already know that a large project would benefit from gridding but you don’t want to create the grid yourself, consider fabric manufactured with the counting grid already present.
Zweigart’s Easy Count Grid Aida uses a 10-stitch grid that corresponds to a chart and is designed to disappear through the specified washing procedure.
There is also Easy-Count Guideline Fabric from R & S Designs, which takes a different approach by incorporating removable guideline material rather than requiring a drawn grid.
This gives you a useful choice:
- wash out the grid
- or
physically remove the grid.
Which Gridding Method Should You Choose?
| Method | Best for | Primary consideration |
|---|---|---|
| Pre-gridded washable fabric | Large/full-coverage projects | Finished work must tolerate required washing |
| Removable monofilament line | Valuable or non-washable projects | Takes longer to install |
| Water-soluble marker | Fast manual gridding | Must test removal first |
| Partial grid | Medium projects | Requires adding references as you work |
| No grid | Small/simple projects | More counting from nearby stitches |
Cross Stitch Expo Recommendation
If the project is small:
Don’t grid unless it helps you.
If the project is large and washable:
Pre-gridded fabric or a tested water-soluble marker can save substantial counting effort.
If the fabric is expensive, hand-dyed or something you do not want to wash:
Use removable gridding line.
If you’re unsure:
Test first.
That one habit matters more than the brand name on the marker.
The Gridding Safety Checklist
Before marking anything:
- Confirm the project would benefit from gridding
- Check fabric-care instructions
- Check thread-care instructions
- Identify any hand-dyed materials
- Choose your gridding method
- Test any marker on scrap fabric
- Remove the test exactly as directed
- Check for remaining marks
- Confirm your first 10 × 10 block twice
Before stitching:
- Match fabric center to chart center
- Make sure your grid orientation is correct
- Photograph the clean grid for reference if useful
Before finishing:
- Remove temporary gridding line completely
- Remove washable markings according to instructions
- Never iron over removable marker unless the manufacturer explicitly permits it
- Inspect the piece before framing
Supply Hall: Useful Gridding Tools
Water-Soluble Fabric Markers
Best when:
your fabric can be washed and you’ve completed a successful test.
Mr. Pen Washable Fabric Markers on Amazon → (paid link)
Dritz Mark-B-Gone on Amazon → (paid link)
Removable Gridding Line
Best when:
you prefer not to draw on the fabric or don’t intend to wash the finished piece.
Look for:
Easy-Count Guideline™
or another smooth gridding material specifically designed to be removed from counted needlework.
Pre-Gridded Fabric
Best when:
you’re preparing for a large or full-coverage project and want to eliminate manual gridding completely.
Look for:
Zweigart Easy Count Grid Aida
or an equivalent fabric whose removal instructions fit the materials in your project.
 What to Learn Next
How to Read a Cross Stitch Chart
Cross Stitch Fabric Counts Explained
What Is Full-Coverage Cross Stitch?
How to Wash Finished Cross Stitch
Embroidery Hoop vs Q-Snap vs Scroll Frame
Explore Supply Hall →
The Cross Stitch Expo Rule
A grid should reduce the risk of a mistake.
It should not create a new one.
So whichever method you choose:
count carefully, test first, and make removal part of the plan before you make the first mark.